Tag Archive for: forex price action

What’s Inside?

A key topic that orbits around price action trading is “how do I trade with candlestick wick patterns in the forex market?” The problem with this question is it comes with some misunderstandings about price action, order flow and what wicks really communicate.

The goal of today’s article is to give you a new perspective on trading price action wicks that most ‘internet gurus‘ won’t tell you. It is to give you an understanding of candlesticks, what they communicate and how to relate and trade them.

Understanding Candlesticks

We’ll give you this understanding and how to trade with candlesticks through 4 key points on forex price action wicks.

But before we get into trading wicks, we have to understand the foundation of where our approach comes from.

Key Point #1: The Difference Between Price Action & Candlestick Trading

I approach trading from a particular perspective that a) order flow is the proximate driver of price action, and b) all activated orders in the market are based upon ‘information‘.

NOTE: If you want to learn more about how I trade price action context, click here.

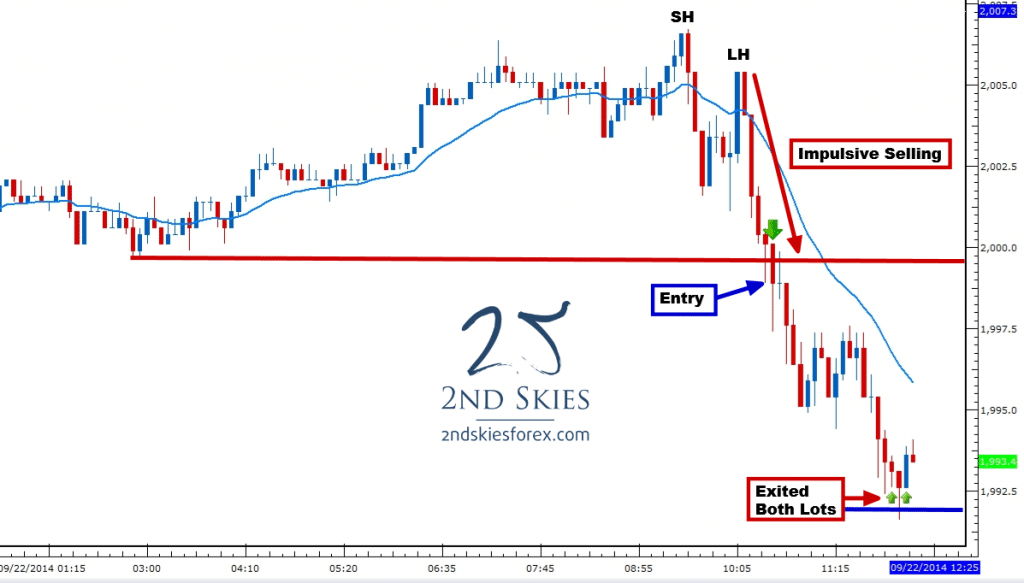
But to simplify it, trading price action ‘context‘ is trading the overall ‘structures‘ or ‘Gestalt‘ of the market. And you cannot get this through 1, 2 or 3 candles.

price action trading-sp500-sep-22-2ndskiesforex

People who trade based upon 1, 2 or 3 candlestick patterns, such as pin bars, or fakey’s, or engulfing bars are candlestick traders.

Fun Fact: The fakey pattern or setup, is really called the Hikkake pattern, given that name decades ago, which today many forex ‘gurus’ have renamed to make them sound like their own.

Regardless, candlestick pattern traders are not ‘price action traders‘. They are ‘candlestick traders’. Essentially, candlestick pattern traders believe 1, 2 or 3 candlesticks define the price action context and order flow in the market, and thus give you trade setups.

But ask yourself, why do many key support or resistance levels hold without a pin bar rejection. Why would it do that if the pin bar is such a superior tool for recognizing and ‘confirming‘ whether the key support or resistance level will hold? Why do banks, hedge funds, and prop traders place orders at particular prices well before a pin bar has ever formed, and not based upon the New York close daily charts?

NOTE: If you want to learn why a typical pin bar entry is a retail entry, click here.

When you start to ask these questions, the foundation for trading pin bars and candlestick patterns breaks down. That leaves you with trying to understand the underlying order flow in the market. And you do this by learning to read and trade price action context.

This is how we approach the market.

Now that we have this foundation, we can move on to how do we relate to forex price action wicks (or any wicks)?

Key Point #2: All Wicks Are Rejections of Value

When you look at the essence of what a wick represents in terms of the price action and order flow, you come to the conclusion that all wicks are a communication. They communicate that the order flow was rejecting that pricing and value.

If the market accepted it, it would close there, and remain there.

However, there is a ‘but’ in there. The ‘but’ is while wicks in the forex market = a rejection of value, they are not for defined periods of time or defined moves in pips.

What I mean by ‘not for defined periods of time‘ is a) beyond the close of their candle, and b) they are not going to define how long the market will reject that move or value from that moment forward.

What does give you this information? Price action context.

The goal of price action context is to give you a ‘probabilistic framework‘ for what the market is more likely to do. Wicks will not give you this information, nor give you a probabilistic framework for how to trade this.

Hence you have to come back to price action context.

price action context 2ndskiesforex

The most essential point to understand here is forex price action wicks (or any wicks) = a rejection, but we cannot understand how that rejection will manifest, so we have to take these as a grain of salt.

What this also means is that 1, 2 or 3 candlestick wicks will not ‘confirm’ a rejection of a specific kind (which is what we want if we’re going to trade said ‘confirmation’ or rejection).

If you want to understand why confirmation price action signals will crush your account, click here.

Key Point #3: Opening And Closing Of Candlesticks Do (And Do Not Matter)

Wait a minute, how can the opening and closing of candlesticks ‘matter’ and ‘not matter’? Let me explain.

In very ‘particular’ circumstances, the opening and closing of candlesticks will matter. Such as:

  1. if you are trading some sort of ‘opening’ gap strategy
  2. if you are trading specific types of breakouts
  3. if you are trading specific candlestick patterns
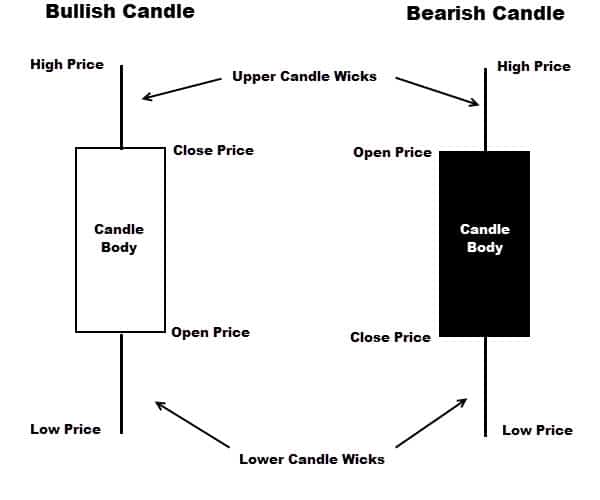
candlstick wicks rejection 2ndskiesforex

There could be a few more circumstances, but by and large, the majority of time, the opening and closing of candlesticks do not matter.

What matters more is order flow and price. This is why most institutions, hedge funds, and prop firms know their price ahead of time, regardless of the close. They know where they want to get in, and where they want to get out, regardless of the candle being open or closed.

Hence the opening and closing of candlesticks matter, but on a limited scale.

Key Point #4: How Do You Trade Forex Price Action Wicks?

There are many ways I relate to forex price action wicks (or any wicks) in my trading, but I’ll give you a couple wick trading strategies below.

Trading Strategy For Wicks #1: With Trend Wicks Will Be More Reliable (or ‘probable’) Trading With Trend vs Counter Trend

If a wick represents on a base level some sort of ‘rejection’, which side is most likely to ‘reject’ the price or value? The with trend players, or counter trend players?

With trend is the answer. With trend players are more often controlling the market and order flow, so they’re more likely to reject a price effectively cause they’re largely in control.

I personally like seeing with trend rejections on pullbacks heading into a level because they are showing a more ‘probabilistic framework’ of order flow in the market.

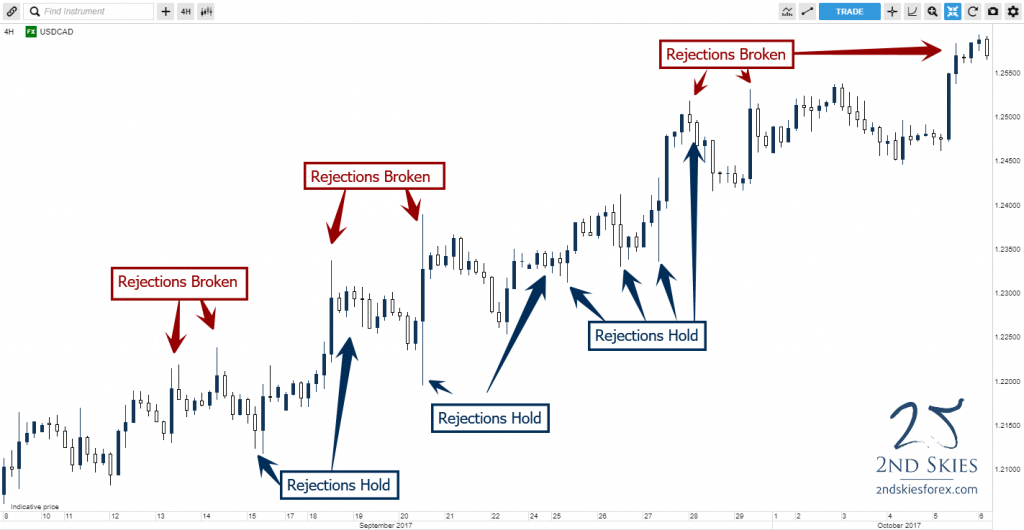
Below is an example of a good chart showing this on the USDCAD 4hr chart.

forex price action wicks holding with trend 2ndskiesforex

Notice how the majority of the wicks and rejections with trend hold, while the counter-trend rejections fail?

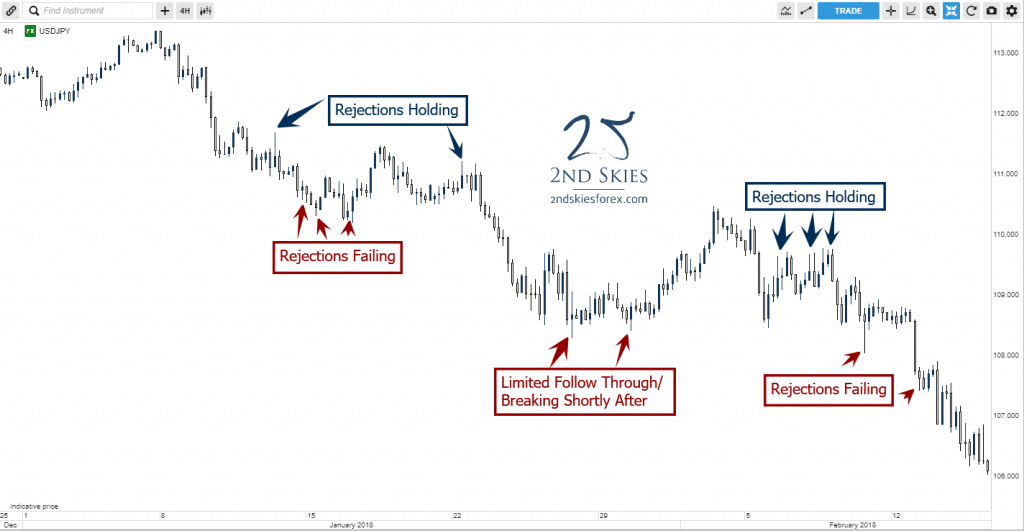
Below is another good example of a chart on the 4hr USDJPY chart.

forex price action wicks holding with trend v2 2ndskiesforex

Hence when trading, if you are trading with trend, wicks rejecting price in your favor make your trade more ‘probable’, while trading counter trend are less ‘probable’.

If you wan to learn more about trading with a probabilistic mindset, click here.

Trading Strategy For Wicks #2: Clean Wick Rejections Off Key Support or Resistance Levels Are Best

What do you mean by a ‘clean’ rejection or wick off of a key support or resistance level?

While I relate to support and resistance as ‘zones‘ of order flow, sometimes they line up super well to where you can clearly see price is rejecting off a very specific price and value.

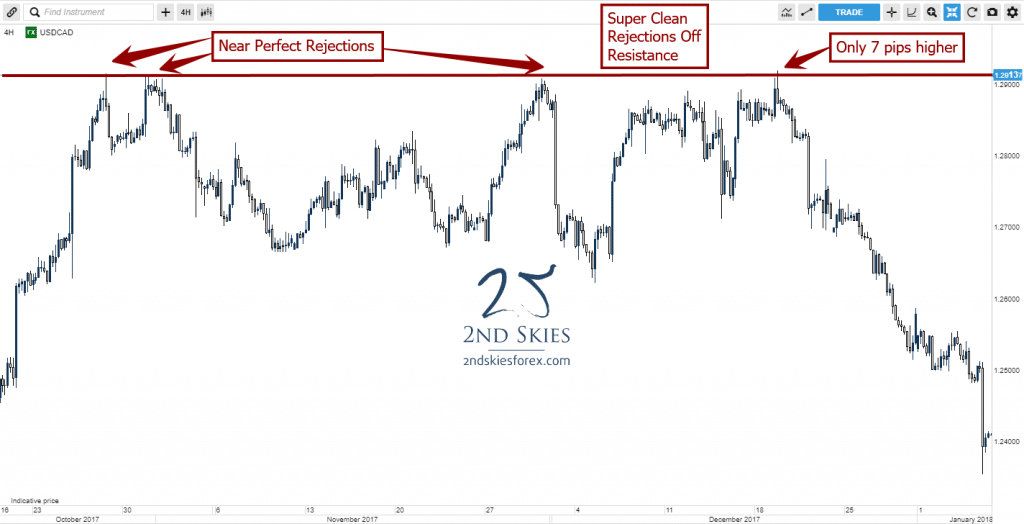
Case in point, take a look at the USDCAD 4hr chart from mid-October last year to mid-Jan this year (~3 mos).

super clean rejections wicks off of resistance 2ndskiesforex

You can see in the chart above, the price action rejected off of the key resistance level near 1.2913 six times in a 3 month period with almost every rejection happening within a few pips of each other, and the biggest break being only 7 pips.

When price rejects very ‘cleanly‘ off of a key support or resistance level, they become more ‘probable‘ of a legitimate rejection.

Not all charts and key levels will look like this, but they do often in many price action structures, and can be good for building your ‘probabilistic framework‘ for understanding price action context and the order flow behind it.

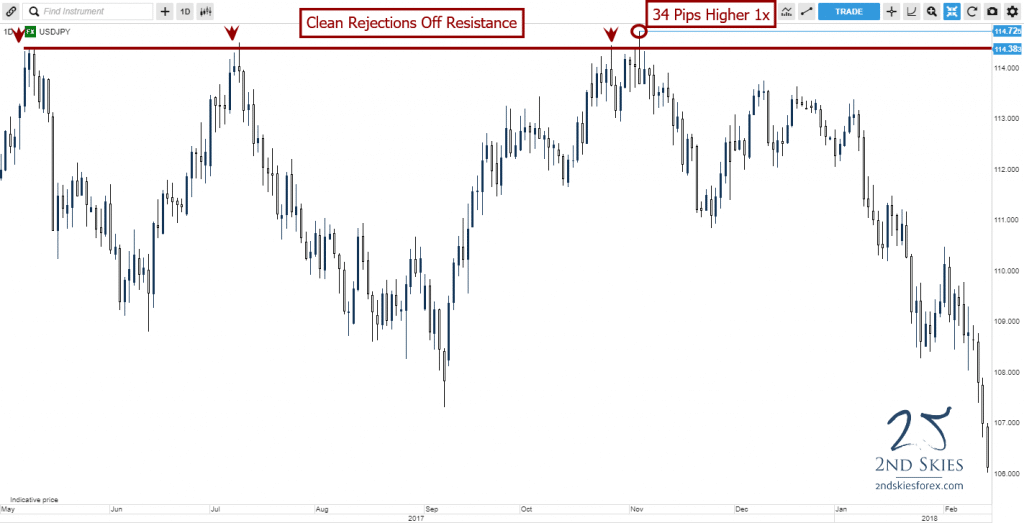
You can see another example of this below with the USDJPY daily chart.

clean rejections wicks off of resistance 2ndskiesforex

Notice how 3 of the 4 rejections were almost at the same price with only one breaking by a small amount?

There are many other ways to understand wicks and rejections in the price action, but these are two good methods to work with that I use personally and trade profitably with my own money.

In Summary

Forex price action trading wicks (or wicks in any market) are important to understand, particularly from the perspective of order flow and price action context. Wicks ‘communicate‘ at a base level ‘rejection‘, but they do not by nature determine any rejection to follow through.

However there are ways you can use wicks in your trading price action, particularly the two methods I mentioned:

  1. with trend wicks add to your ‘probabilistic framework’ better than counter trend wicks
  2. clean wick rejections off of key support and resistance levels also add to your ‘probabilistic framework’ for trading

Now Your Turn

What did you learn from this free trading article? Do you feel you understand candlestick trading wicks, rejections and how they work in forex applications?

Make sure to leave your comment below, along with share this via Twitter or Facebook with those you think can benefit from this.

Watch as I execute two live price action trades on USDJPY & USDCAD, up +250 pips in total.

In this live trading video, I go through the price action context, explain my trade location, stop loss placement, my final target, and why I did not use a confirmation price action signal.

Here’s the transcription for the video (and just below is the follow up screenshot of how I traded it and closed it near the top when the price action changed in my mind and the breakout became less likely).

follow up usdjpy live price action trade 2ndskiesforex

“Hello traders here. Chris Capre. 2ndskiestrading.com.

I have a few live price action trades that are running right now so I wanted to share with you a couple of them, my entry, my method for getting in, my stop loss placement, my take profit, why I chose these things, to give you an idea how I trade and how I teach my members to trade in the Advanced Price Action course.

So before we get into the trades, I just want to show you right here this is a live account, I’m trading with my own money right now. This says real, if it was a fake account or demo account it would say demo. So just to let you know I am trading with my own money. As you can see, these are moving in real time, everything matches here: 109 pips, 109 pips so it all matches.

And so I’m in the market live right now. I’ve been in since December 3rd, late last week. This one is actually a relatively straightforward trade. USD/JPY has been in a bullish run as of late, after it broke out of a large range structure. Formed a nice impulsive leg up and then it formed a corrective structure which is outlined in this blue box here.

Now these structures are very important and this is important for understanding price action context. Generally when an impulsive move happens, like we have here, the next move is for the market to form a corrective structure which is like a balancing phase. And as long as the price action context and the bulls are still in control, then I’m expecting this to play out with an eventual move to the upside.

The great thing about corrective structures, especially in bull trends, is that they offer you with trend opportunities to get long at the base of the corrective structure. I actually had a trade setup right here before but I missed by a couple of points ’cause I was basing it off these lows here.

So when the market came back again I lifted it to just at the bottom of this low right over here to get myself into the market. I did not wait for a price action confirmation signal. Even though this formed a pin bar, if you waited for a 50% retrace tweak entry you would’ve missed it.

And so I didn’t wait for one here, and I just placed a limit order to get long at this level, assuming that the price action was gonna hold, the context was correct, and that my trade location was good. Even in this one here, this did form a pin bar, the thing about it is is that if I did wait for a 50% retrace tweak entry, my entry would’ve been poor. It would’ve been higher up and now I had less profit available to me.

This is important to understand, this is part of the reason why I don’t trade with confirmation price action signals. They give you worse entries, they give you retail entries. Sometimes you’ll miss the same move completely, a perfectly legitimate move. And they also give you lesser profitability.

Now, in terms of my stop loss placement on this one here, this is very straightforward. In this recent run up we had a move up here, it paused back and then a big breakout bar. My real reason for getting in the market was the base of this structure holding.

So I wanna place my stop loss below this here. How much? That kinda depends because I was getting in before NFP, I had to expect some volatility so I didn’t wanna keep it too tight. So I put it just below this here, a little bit below that. It’s about a 51 pip stop and I’m in here at 123.32 and the stop is at 121.81 so I have about a 50 pip stop and I’m currently about up about 109 pips. So I’m up a little over +2R.

And as you can see the trade never really went into the negative. It just happened to be a really good trade location. Does this happen all the time? No, it doesn’t. Sometimes trades are not ideal. In fact, I’m gonna get into one just shortly after this.

Real briefly though, in terms of my take profit, if I was trading this range structure, I should be getting out right about here with a nice +2R profit and that would be it. But I’m anticipating a breakout. If I’m wrong, I’m willing to take some profit off the board, bringing my stop to breakeven and hope for a breakout. And if it comes back down here again, I’ll buy it again assuming the range sructure’s gonna hold.

My target is actually a little bit higher here, just above 125 and a quarter. So with a 50 pip stop and a 300 pip target, that’s a +6R potential on the board.

Now, the next trade I’d like to show you here is one that’s not a perfect entry. It’s the kind of trade that wasn’t textbook and I’m not saying it’s easy. A lot of trades are more like this one right here.

This is the USD/CAD. So USD/CAD also in a nice bull run. We have an impulsive/corrective slightly choppy move up and we form a double tap here. So I’m looking to get long and I can either get long on a pullback but I miss this one here. Once we broke out I was expecting this resistance to hold.

So I just bought on a pullback, I didn’t wait for a signal. I just bought on the level assuming it would hold. It didn’t. Luckily I was right on two accounts.

One, I was right that the bulls were still in control and so I wanna be more long than short. Two, I was right on my stop loss placement. Which was below this swing here. So I placed it below this swing because I felt like if the bulls were in control, they shouldn’t make it back into the range too far and they shouldn’t make it below where this swing had started.

So with that being said, it turns out I was right. And what eneded up happening was the pair ended up forming kind of a channel like structure. An ascending channel. I didn’t see this at that time and it wasn’t fully formed at that time but as I re-evaluated, I realized “ok, this is actually what’s really happening out here”. So, if I’m correct, the channel structure should hold, it should continue to drift higher and if I’m right it should break out.

And that’s what it did here recently. I could’ve bought on the bottom of the channel but considering that I spent a huge majority of the time in the negative and only a decent amount of time in the positive, maybe 40% of the time, I really didn’t feel like adding on to a loser. I generally like to add on to winners, not adding on to losers.

With that being said, it turns I was right on this. It turns out my bullish price action context read was correct and that my stop loss placement was correct. And so in terms of the trade right now, it’s up 132-134 pips. My total stop loss on this one was about 110 pips. So with a 110 pips, I’m up about +1.25R right now.

In terms of where my take profit is, that is way up here. It’s at 1.38 and 1.38 is about a 450 pip target with about a 110 pip stop. So it’s about a +4R on this one here.

The reason why I’m showing this one is I wanna show you an example of a trade that’s not textbook and that’s not a perfect entry. The bottom line is that the majority of your trades will actually be more like this than the USD/JPY trade and these are the trades that challenge you the most mentally and psychologically.

But I trust my price action context, I trust my skillset, I trust my mindset and I trust my read on the market. I was willing to let this trade play out. So I wasn’t sitting there worried about “am I gonna get stopped out? what did I do wrong?” or anything like that. I just let the trade run, I held my stop loss as is and either I’m getting stopped out or I’m gonna make some money on this one.

And right now I’m making some money on this one.

I’ll probably start neutralizing the risk very shortly and I’ll probably bring it up either under one of these swings here, maybe even into some profit since we’ve broken out of this strucutre.

This is how I trade. This is how I trade with my own money and this is what I teach in my Advanced Price Action course.

So, with that being said, if you are interested in trading like this, then make sure to come check out my Advanced Price Action course where I give trade recommendations like this several times a week. I teach you the same methods I use, I teach you the same entry techniques and strategies. How I place my stops, how I choose my targets and how to build your price action skills.

I’m not just teaching strategies, I’m teaching you how to build your own price action skillset. So that you can learn to make your decisions yourself, find these trades yourself and make money trading.

So if that sounds interesting to you, make sure to check us out. Also come by 2ndskiestrading.com and take a look at all the other videos and articles we have on trading.

With that being said, I bid you all adieu. I wish you good health and good luck trading and I hope to see you in the course. Take care everyone!”

Watch as I execute a live price action trade on the NZDUSD up +100 pips.

In this NZDUSD Forex Trade Video, I go through the price action context, explain my trade location, stop loss placement, my final target, and why I did not use a confirmation price action signal.

Here’s the transcription for the video (along with the screenshot on how it ended up for profit…just not as much as I wanted)

nzdusd trade for profit 2ndskiesforex

“Hello traders here. Chris Capre. 2ndskiestrading.com

I have a couple of live price action trades that I’m in right now and I wanted to share with you some of my analysis on this, what price action context I was seeing in the market, what was my trade location and why. Why did I choose my stop loss placement and my take profit. So these are methods that I actually teach inside the price action course and so by sharing this with you I’m kinda giving you an insight into how I trade and the kind of trades that you could be making if you were to learn these methods.

Now, just to verify, these are live trades. You can see right now these all match right over here. As you can see, it says real over here. That would say demo, if it was a demo account, it would say demo. So it’s real, it’s saying I trade with my own money. I only trade with my own money. That’s also why you don’t see long disclaimers before my videos, because I’m actually using live trades. If I was using demo trades or fake trades or something like that, I’d have to have a long disclaimer explaining all kinds of things why that is.

So, with that being said, let’s start off with the price action context. So stepping out to the 4hr chart, we can see that this right here was a clean role reversal level here. It’s resistance here, support and support and strong rejection or bounce here but then a weaker one here. Lower high and then aggressive selling afterwards. Now, with the selling and the strong breakout below this, I was expecting a pullback to that role reveral level and was looking to get short.

That kind of explains the context and my trade location. I chose this level, I could’ve chosen a little bit higher which would’ve been a little bit more conservative. The advantage of that is it would’ve given me more me more profit potential but the downside is that it reduces my potential to actually get in the trade or reduces the probability that the trade will activate.

So I chose this one here. In terms of my stop loss placement, I had a couple of options. I could’ve put just above this level but I felt with volatility that it might’ve been a little tight and I could’ve put just above this here which would’ve been the most conservative so maybe just above here. I actually chose to put it above the move that started the breakout. So the breakout started above the level in a strong impulsive selling led to the breakout and it started over here.

I said ok, let’s put my stop a few pips above that. If it were to return above the level and get back above the move that started the breakout in this case, I wouldn’t wanna be in it at this point. So initially this held, we had a kind of volatility spike and exhaustion move intraday yesterday that went past it but then it just didn’t get any follow-through, no traction, sold off below it and never was able to get back above it.

I would like to note that if you were trading a 1hr pin bar signal, and you looked for your 50% retrace tweak entry, you would’ve gotten in about here and you would’ve gotten stopped out with your stop just above the pin bar highs. On top of it, you would’ve got a worse entry again. This is why we don’t wait for confirmation signals. They give us worse entries and they reduce profitability and accuracy.

In terms of take profit, let’s zoom out a little bit to the daily chart and I’ll show you why I chose my target. My target is down here. I may choose a little bit towards the base a little bit lower around .6250. That is a potential for me. I am expecting a return at least towards this resistance here at .6425. And it may get stuck there for a little bit but if we get back below this and into this kind of consolidation zone or corrective structure which you can see here, then my feeling is it should be able to make it through towards the bottom of that.

So I may lift the limit and target a little bit lower. Right now it’s at about .6303 which you can see here. But I may lower it if we get through it pretty cleanly and target .6250. Either way, I’m in at .6625 so I have a 320-something pip target right now with a total 30 pip stop. So we’re talking about a +10R.

Again, you don’t need huge stops to make trades like this. You shouldn’t need huge stops if you get really good trade location and really good timing. And again, these are methods that I teach in my price action course. Which you can make these trades yourself.

Wwith that being said, hopefully this explains how I trade, my entry method, my trade location, how I determine that. How I use my stop loss placement and my take profit.

Again, I don’t recommend waiting for confirmation price action signals. That’s a beginner’s mindset, it’s a retail trader’s mindset. I’ve talked about this before. Professional traders aren’t waiting for confirmation. They find their trade locations ahead of time and they make that. And if you make your entries based on one candle, then you’re missing price action context and you’re missing structure which is always gonna be far more important than one individual candle.

I don’t wait for those and I teach you how to find good trade locations, where you don’t need large stops to make trades like this. And you shouldn’t have to be waiting for days or weeks to make trades like this as well. Again, you can see that I was in this trade from the 5th and here we are a day later and we are already up +3R. So if you’re having to wait 2-3 weeks for a trade to activate, you aren’t trading price action and if you have wait weeks for a trade to hit +2R or +3R, again you aren’t trading price action ’cause these trades happen all the time.

You can learn how to find these trades. You can learn how to make these trades and that’s what I teach you in my price action course.

So with that being said, I hope you enoyed this video. I hope you got a lot of information about this and how I trade price action. Make sure to check out my website, 2ndskiestrading.com, where I have other videos and resources like these.

Until then, I bid you all adieu, good luck trading, I hope you’re healthy and happy. Take care everyone!”

Watch as I execute a live price action trade on the GBPUSD up +120 pips.

In this price action trade video, I go through the price action context, explain my trade location, stop loss placement, my final target, and why I did not use a confirmation price action signal.

Here’s the transcription for the video:

“Hello traders here. Chris Capre. 2ndskiestrading.com

So, I want to share a live price action trade that I’m in with you right now. This is actually a trade setup that we have posted in the members commentary, trade setup commentary, in our price action course on Sunday and it activated on Monday and here we are on Tuesday and it’s well into profit and so…

I want to talk about this trade in terms of trade location, in terms of stop loss placement, in terms of take profit, trade management and kinda give you the overall price action context here. Now, just to make sure you know, this is a live trade, you can see this is an open position right now, this all matches. And also this says real right here. So FXCM, if it’s a demo account, that real will say demo, it will never say real. So you know this is a trade I’m in with my own money right now, that I only trade with my own money. And so, with that being said, let’s talk about the price action context first.

So, as we can wee, the GBPUSD has been relatively in a corrective structure range. It’s about 250-300 pips high, from 1.55 down to 1.52. Now, we had an impressive bull run, an 8 candle bull run into 1.55. But then what happened with all that bullish momentum? It ran into the big figure at 1.55, and it kinda triple tapped here. Suggesting that the offers were willing to hold the line here and kinda mount a challenge and stop this momentum. They were able to eventually reverse the momentum and show with strength that they could push this back down. And they did, 250 pips. And you can see this strength kinda coming in in a typical impulsive, corrective, and impulsive, corrective structure here.

So we had a relatively good idea in terms of trade location at 1.55, and so we said ok, we literally said on Sunday, look, we are looking to sell, if you’re bearish you wanna be selling at 1.55, and we don’t need a large stop loss on this. We feel that the corrective structure will hold and because the offers held 1.55 very cleanly which you can see here with the wicks all around the same height, we don’t need a large stop loss. If the wicks are much more varied, a short, a long one and a medium one, then that would show not only volatility but a wider range in the depth of the order book around 1.55. Therefore we would need a much larger stop loss. But we didn’t have that. We had a very clean reaction from the offers here at 1.55.

So we said ok, we’re gonna look to sell 1.55 and you don’t need a large stop loss. We actually placed ours, 34 pips above, which you can see here, stop at 1.5530, and an entry at .54969. We literally ended up top-ticking the market. As you can see the high was 1.5497. So by .1 pips we got literally the best entry by .1 pips. That’s not common, it doesn’t always happen that we get that perfect entries. I literally missed another trade today by a pip. That’s just gonna happen, that’s part of it. Sometimes you’re gonna get these little gems that hit perfectly. But when you find good trade locations, you should have relatively good entries, near where the market stalls and turns.

So, because of that, because of this reaction here, we can have a tight stop loss, you shouldn’t need a large stop loss if you can find good trade locations. Now, in terms of our target, the offers that held here at 1.55, they pushed it all the way down to 1.5250 before some impressive bullish momentum came back in the market. And the change of hands happened here. So we’re expecting the bears to try and target this. If they’re gonna show that they have equal strength in the market, then they’re gonna want at least tag this and say ok we’re gonna push you back to where you started. So that’s our target.

We do see an interesting role-reversal level here on 1.5375, so you can see this is an interesting role reversal level. The market might get stuck here, and if it does, we may take some profit and neutralize all the risk at that point. But if we get below this here, then I see relatively clear or smooth sailing down to .5250. So that would be a 250-pip profit on a 34 pip stop. So we’re talking about a +8R.

Briefly I wanna talk about the entry in terms of how we placed the entry and time and everything like that. And then we’ll wrap this up.

To make sure we didn’t place any confirmation price action signal. We don’ wait for confirmation price action signals. Those lower your accuracy, they lower your profitability and they give you worse locations. There was no pin bar on the 4hr chart, there was no pin bar on the 1hr chart, or anything like that. And on the daily chart there was an interesting one here but assuming you got the 50% you know, retrace tweak entry, you’re not getting in till here so you’re missing this.

Now let’s be generous. Let’s say you absolutely top-ticked the daily candle today and you got an entry. Where’s your entry? The high is .5445. Your stop has to be above .55 now. So you have a 55 pip stop with right now about a 70 pip profit. You’re barely up 1R at this point. We on the other hand got in at 5496 with 34 pip stop. So while you’re just cracking your first +1R, we’ve already got 4 times the profit as you do. So you can see how waiting for confirmation price action signals reduces profitability tremendously. In this case by 400%. And it gives you a much larger stop loss if you do it waiting for a confirmation price action signal and you might’ve even missed this trade completely. So it lowers your accuracy, and it lowers your profitability massively.

So that’s very important to note. Lastly, you shouldn’t have to be waiting for 2, 2.5 weeks for a trade setup to materialize. If you have to wait 2.5 week for a trade setup to materialize, then you’re not reading price action. You’re not trading, you’re missing opportunities like this all the time. ’cause these happen quite a lot and way more frequently than 2.5 weeks. We aren’t waiting for that long. We posted this on Sunday, it hits on Monday and we’re already well into profit not only on Monday but on Tuesday as well.

So, if you’re having to wait around for 2.5 weeks to find good trade ideas, then you’re not reading price action correctly and you’re not actively trading the market and if you’re not active, you actually slow your learning curve and you actually make it harder to build up your skillset. So these are a couple of points we kinda wanna mention and make sure you understand.

Now, if you are interested in learning how to trade price action the way we do, then make sure to check out my advanced price action course where we’ll teach you how to find premium entries like this, how to read the price action context properly, how to find trades that you don’t have to wait around for weeks on end. And how you can get better stop loss placement, a higher profitability on the same trade ideas.

So, if that seems interesting to you, make sure to check out our price action course. Also make sure to come by and check us out at 2ndskiestrading.com, where we post market commentary and trade ideas like this as well, along with a bunch of other free articles and videos.

Other than that, I hope you enoyed this video, I hope you enjoyed the explanation on this and the demonstration of how I trade and what I teach to my members. So with that being said, I wish you good luck in the markets, make sure to comment on the video below, what you got from it and other than that I wish you good health and good trading. Take care everyone.”

Watch as I execute a live price action trade on the USD/CHF. Currently up +143 pips, I explain my entry, stop loss placement and why I took the trade.

Here’s the transcription for the forex trading video:

“Hello traders here. Chris Capre, 2ndskiestrading.com.

Today I have a live price action trade here for you on the USD/CHF where I’m going to explain my entry, my stop loss, my take profit levels and why I took the trade.

As you can see from the chart, I’m up about +143 pips roughly at this point and it matches down here in the platform. You can also see that this is a real money account.

FXCM with all their platforms whether you’re on the institutional platform, the Active Trader, or the more common retail one which is their Trading Station 2 with New York Close forex charts will always say real when it’s a real money account and it will say demo when it’s a demo account.

Moving on to the trade here, we can see it was opened about 24 hours ago, it’s about 6 4-hour candles.

I’ve been talking to my members about this in my price action course, that the 0.95/0.9525 is a key support level.

On the 20th, the bids held this area really well, you can see there was kind of a lot of absorption of the offers here and they eventually started to push back and in that process the market tried to come back a little bit but then the bids stepped in and pushed it up another leg higher.

So I was thinking that it may not come back to the 0.95 level again so I was willing to get in at 0.9529.

I don’t consider this a textbook entry as you can see, it did go to about 0.95 again, so that would’ve been the textbook entry.

So my entry wasn’t perfect by any means, but the overall trade location was solid, this range support area has held 3 times now, so this is a really good trade location.

My stop loss placement was just a few pips below the low of the lowest push below this 0.95 here. So I have at this point a 54 pip stop and being up about 142 pips gives me almost about a plus +3R, it’s about 2.6.

Now, in terms of my target, it’s at 0.9825 and that’s the most recent spike highs.

So assuming that the bulls are gonna continue to maintain this range, at a minimum they should attack about this high right here at 0.9750 which would still offer me about +4R, but I’m gunning for this one here, expecting that it’s gonna try and make an attack up here and that would give me about +5.5R.

In terms of trade management, if the price action attacks this 0.9800 handle or above here pretty aggresively, I may be open to lifting the limit and then gunning for a larger move back towards parity or maybe 0.9950, which would add a lot more profit and R onto the trade.

In terms of the stop loss management, at this point I’m likely gonna lift the stop pretty soon here, and lock in some profit soon, perhaps just under 0.96, which would be this kinda area right over here.

And that would neutralize all the risk and lock in some profit and be in a risk free trade at this point.

But that’s pretty much it in terms of my entry, stop loss, take profit location and my price action analysis behind this.

I’m simply playing the range here, it’s a medium term range structure and so I’m playing the range on both sides, with a slight bullish bias right now.

But did you find this lesson useful?

Please make sure to like, share and tweet it below, and I’d love your comments on this and what “a-ha” moments you had from this.

Also make sure to check out my website, 2ndskiestrading.com, and check out all the free forex trading articles and videos there.

If you want to take your training to the next level, make sure to visit my price action course, where I teach you how to make + high R trades, just like this.

And that’s pretty much it, this is Chris Capre with 2ndskiestrading.com where I teach you how to change the way you think, trade and perform.”

Here is a sneak peak from a video lesson in our price action course. The third topic of the lesson had to do with liquidity, price action and how that affects trading. We discussed how knowing the liquidity of an instrument is crucial to understanding how to trade it and how it will affect the price action, along with your stops and take profits.

sneak peak price action course 2ndskiesforex

I wanted to write a brief article on a simple method I use to analyze price action – that of drawing trend lines to read the forex price action angles, or the speed of the buying/selling in the market.

I’m going to use an example to highlight how they can be useful for understanding trends, transition phases in trends, and when to look for key price action reversals in the market.

Exhibit A:  EUR/USD Daily Chart
price action angles - trading forex price action 2ndskiestrading.com sept 17th

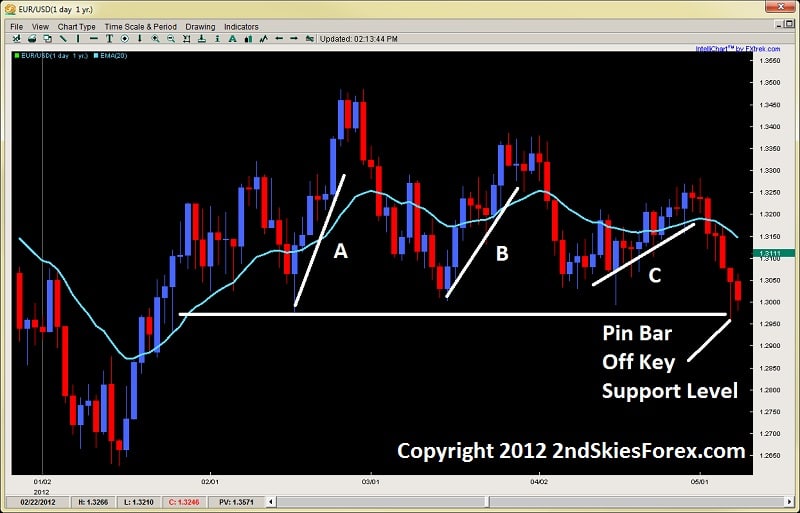
Looking at the forex price action trading trendline chart above, the EURUSD started 2012 dipping to 1.2600 before starting an impulsive bull run which climbed almost 900+ pips in a month and a half.  Now if you look towards the left side of the chart, you’ll see a pullback to the horizontal line.  Price rejected off this line, forming a piercing pattern that climbed 6 out of 7 days and over 500+pips.

This is the move in line A.

After reaching the peak from move A at about 1.3500, price then sold back in 11 days back towards the same support line.  Although the low from this sell-off was a tad higher, take a look at the bounce off the level.

Notice how it had 3 bear days in the 8 day move (2 more than in prior move), but only went about 400pips (20% less)?

To me, when I see two rejections off a key level, I’ll draw trend lines on both of them (underneath if they are bull moves, and above if they are bear moves).  The reason I do this is to measure the strength or speed of the buying/selling.  This is communicated to me by looking at the price action angle of each trend line.

In this case, I have a weakening angle from A-to-B.  This communicates a weakening effort by the bulls and that the bears are trying to take control of the market.  Keep in mind, this is all happening above a support level, so the bulls still have overall structural control.

When you however look at the last bounce off this noted support line, we can see a massive weakening in the angle.  When I see three structural, or price action angles weakening successively, this usually is a sign of an impending breakdown.  What is also interesting is the C leg took 12 candles to gain only 250pips (50% less than A-leg, and 38% less than the B-leg).  Put these two together, and you should be looking for a breakout to the downside.

What is interesting is how price action formed a pin bar strategy off this key level.  If you were just trading pin bars as is, without the ability to read price action in real time, you would have taken the long on this pin bar setup, but then got crushed on the ensuing breakout which is below.

Exhibit B: EUR/USD Price Action Angle Weakening/Trend Change
price action angles - pin bar strategy trend change 2ndskiestrading.com chris capre

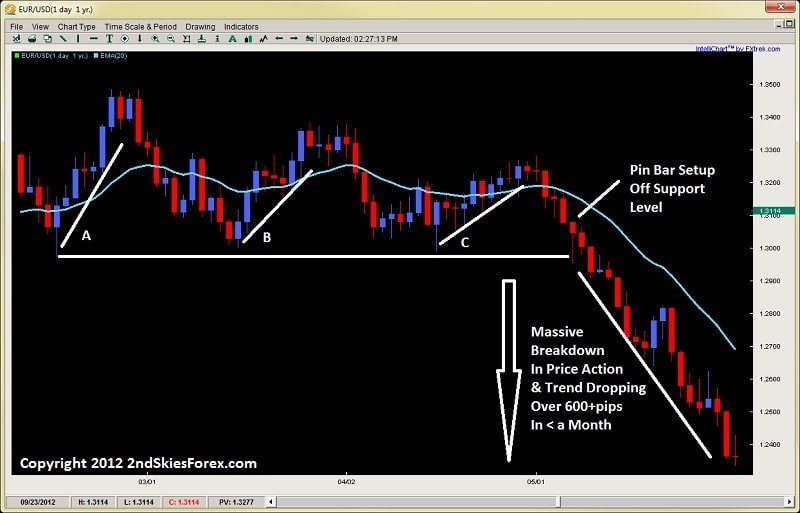
Working with this chart above, we can see how even though there was a pin bar setup at the horizontal support level, price dropped right through that – stopping out traditional pin bar traders who were not reading the price action in real time, or the change in the angles.

In a flash, the trend was reversed and the pair sold off over 600+pips in less than a month.  Had you been reading the price action angles in real time, you would have spotted this potential trend change, and looked to get short instead of longing off the pin bar setup.

This is one way to use forex price action angles to help with your reading and understanding price action.

Another way you can use them is in understanding parabolic or climactic price action moves.  These can also be understood via these trend lines and angles.  But they are a simple tool which is highly useful in forex trend trading, understanding transition phases in trends, and when to look for possible reversals.

I hope you enjoyed this article and found it a useful addition to your price action trading toolbox.

For those wanting to learn to trade price action, get access to the traders forum, a lifetime membership with free updates and more, visit my forex price action course page.

This lesson is focused on one of the least discussed topics in trading – price action. In this forex price action training video we teach you how to identify a critical component of price action – Impulsive vs. Corrective moves.